Now I'm going to tell how add sinhala fonts to an android application. So we need sinhala fonts TTF files.
This techniques can be used for other language also, so basically what do we need is any language TTF files.
Firstly, create an android project, my sample project is named as 'LanguageApp'
Then you can add any sinhala TTF file to the assets directory in the project(copy and paste).
I'm going to create a sample Sinhala to English converter using button event. So I have create main.xml file using two edit text filed and a button.
<?xml version="1.0" encoding="utf-8"?>
<LinearLayout xmlns:android="http://schemas.android.com/apk/res/android"
android:orientation="vertical"
android:layout_width="fill_parent"
android:layout_height="fill_parent"
android:weightSum="1">
<LinearLayout android:layout_width="match_parent" android:id="@+id/linearLayout1" android:orientation="vertical" android:layout_height="wrap_content">
<EditText android:layout_height="wrap_content" android:id="@+id/editText1" android:layout_width="match_parent">
<requestFocus></requestFocus>
</EditText>
</LinearLayout>
<Button android:text="Tnkak" android:layout_height="wrap_content" android:id="@+id/button1" android:layout_width="104dp"></Button>
<EditText android:layout_height="wrap_content" android:id="@+id/editText2" android:layout_width="match_parent"></EditText>
</LinearLayout>
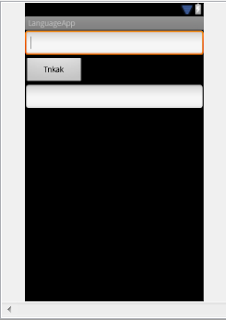
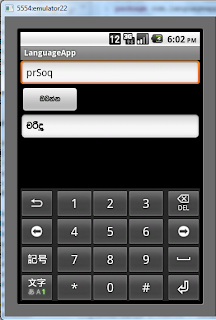
In this button, I have given like android:text="Tnkak", What I do is, this English letters are related to Sinhala ඔබන්න(Click) word.
This is my LanguageAppActivity class
package com.languageapp;
import android.app.Activity;
import android.graphics.Typeface;
import android.os.Bundle;
import android.view.View;
import android.view.View.OnClickListener;
import android.widget.Button;
import android.widget.EditText;
public class LanguageAppActivity extends Activity implements OnClickListener {
/** Called when the activity is first created. */
@Override
public void onCreate(Bundle savedInstanceState) {
super.onCreate(savedInstanceState);
setContentView(R.layout.main);
Button myButton=(Button)findViewById(R.id.button1);
Typeface type=Typeface.createFromAsset(getAssets(), "ARADANA.TTF");
myButton.setTypeface(type);
myButton.setOnClickListener(this);
}
@Override
public void onClick(View v) {
// TODO Auto-generated method stub
Typeface tf = Typeface.createFromAsset(getAssets(),"ARADANA.TTF");
EditText et=(EditText)findViewById(R.id.editText2);
et.setTypeface(tf);
EditText editText=(EditText)findViewById(R.id.editText1);
et.setText(editText.getText());
}
}
I have highlighted to show that how I change font to Sinhala.
After run the application we can see like this output and give some English words to edit text and click the button. You can see convert English fonts related to those Sinhala fonts.
I have uploaded sample project,
LanguageApp.zip
Sunday, June 17, 2012
Saturday, June 16, 2012
Android Button Event
In my previous post, I have mentioned that how create an android project. So I directly give instructions after creating the project part.
My project name is 'ButtonEventApp', In this project I have two java class in src and two xml file in layout.
Therefore you need to create java class named ButtonEventAppActivity.
Select ButtonEventApp in Package Explorer and right click the package then -> New -> Class
Name : ButtonEventActivity2
Then create a xml file in layout folder
Select ButtonEventApp in Package Explorer and right click the layout then -> New -> Android XML File
File : main2
This is my ButtonEventAppActivity.java class
package com.buttonevent;
import android.app.Activity;
import android.content.Intent;
import android.os.Bundle;
import android.view.View;
import android.widget.Button;
public class ButtonEventAppActivity extends Activity {
/** Called when the activity is first created. */
@Override
public void onCreate(Bundle savedInstanceState) {
super.onCreate(savedInstanceState);
setContentView(R.layout.main);
Button next = (Button) findViewById(R.id.button1);
next.setOnClickListener(new View.OnClickListener() {
public void onClick(View view) {
Intent myIntent = new Intent(view.getContext(), ButtonEventActivity2.class);
startActivityForResult(myIntent, 0);
}
});
}
}
This is my ButtonEventAppActivity2.java class
package com.buttonevent;
import android.app.Activity;
import android.content.Intent;
import android.os.Bundle;
import android.view.View;
import android.widget.Button;
public class ButtonEventActivity2 extends Activity{
/** Called when the activity is first created. */
public void onCreate(Bundle savedInstanceState) {
super.onCreate(savedInstanceState);
setContentView(R.layout.main2);
Button next = (Button) findViewById(R.id.button2);
next.setOnClickListener(new View.OnClickListener() {
public void onClick(View view) {
Intent intent = new Intent();
setResult(RESULT_OK, intent);
finish();
}
});
}
}
This is my main,xml file
I have added a text view and a button, By double clicking on them, we can edit their variables
<?xml version="1.0" encoding="utf-8"?>
<LinearLayout xmlns:android="http://schemas.android.com/apk/res/android"
android:orientation="vertical"
android:layout_width="fill_parent"
android:layout_height="fill_parent"
android:weightSum="1">
<TextView android:layout_height="wrap_content" android:text="Page 1" android:id="@+id/textView1" android:layout_width="match_parent" android:layout_weight="0.05"></TextView>
<Button android:text="Go Next Page" android:layout_height="wrap_content" android:id="@+id/button1" android:layout_width="match_parent" android:layout_weight="0.05"></Button>
</LinearLayout>
This is my main2.xml file
<?xml version="1.0" encoding="utf-8"?>
<LinearLayout
xmlns:android="http://schemas.android.com/apk/res/android"
android:orientation="vertical"
android:layout_width="match_parent"
android:layout_height="match_parent" android:weightSum="1">
<TextView android:layout_height="wrap_content" android:text="Page 2" android:id="@+id/textView1" android:layout_width="match_parent" android:layout_weight="0.06"></TextView>
<Button android:text="Go Previous Page" android:layout_height="wrap_content" android:id="@+id/button2" android:layout_weight="0.06" android:layout_width="match_parent"></Button>
</LinearLayout>
After that We have to add activity for the AndroidManifest.xml file
<?xml version="1.0" encoding="utf-8"?>
<manifest xmlns:android="http://schemas.android.com/apk/res/android"
package="com.buttonevent"
android:versionCode="1"
android:versionName="1.0">
<uses-sdk android:minSdkVersion="8" />
<application android:icon="@drawable/icon" android:label="@string/app_name">
<activity android:name=".ButtonEventAppActivity"
android:label="@string/app_name">
<intent-filter>
<action android:name="android.intent.action.MAIN" />
<category android:name="android.intent.category.LAUNCHER" />
</intent-filter>
</activity>
<activity android:name=".ButtonEventActivity2"></activity>
</application>
</manifest>
You can download source file of the project.
First Android Application
First you have to create an android project using eclipse.
File -> New -> Android Project,
Then you can see 'New Android Project' window.
It consists of some fields, like Project Name, Build Target, Properties and Working Sets.
In my sample application,
Project Name : FirstAndroidApp
Build Target : Android 2.2
Package Name : com.firstandroidapp
(Do not need to edit auto filling fields)
Then you can see project is in the Project Explorer (left hand side of the eclipse).
Then explorer FirstAndroidApp -> src -> com.firstandroidapp and open FirstAndroidAppActivity class
Now you can see the code of that class.
Then explorer res -> layout and open main.xml
Now you can see Graphical Layout and main.xml below and Form Widget on the left side.
You can add any widget and save the main.xml file
After that you can build the project
Select project in Package Explorer right click on it and select Build Project
After build the project, right click on the project Run As -> Android Application
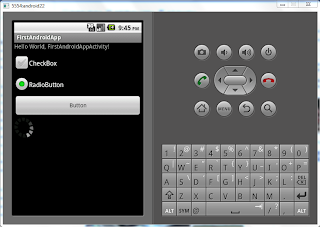
Then you can see pop up the emulator and run the application.
You can download source code of the FirstAndroiApp and then import into the workspace. FirstAndroidApp.zip
Subscribe to:
Posts (Atom)


